
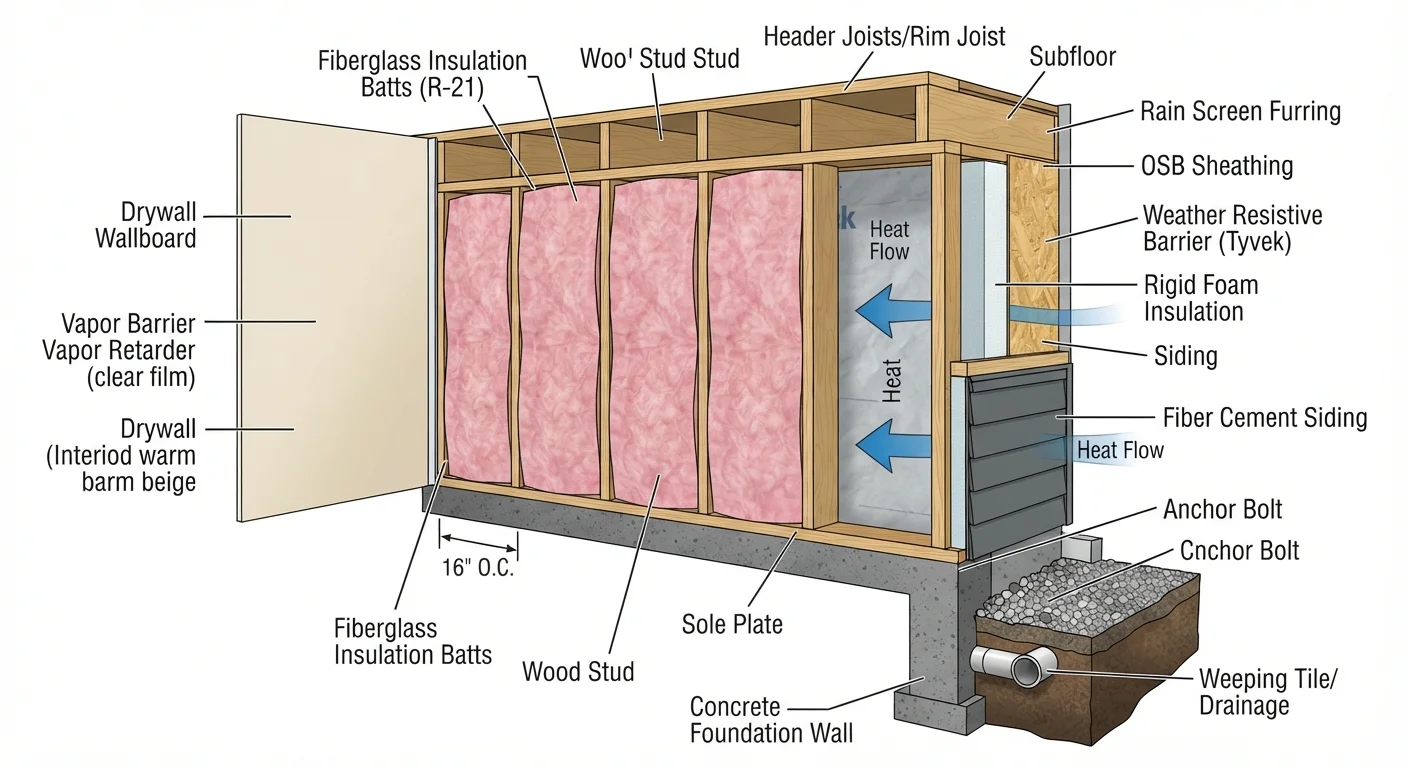
How Heat Transfer Works
Insulation is only meaningful once you understand what it's working against. Heat moves in three ways: conduction (direct contact through a solid), convection (movement through air or liquid), and radiation (energy traveling as waves, like sunlight warming a wall). In a typical home, all three are at work simultaneously.
In winter, the warm air inside your home is constantly trying to migrate through walls, ceilings, and floors toward the colder outdoors. In summer, the opposite occurs - outdoor heat pushes inward. Insulation creates resistance to that movement, slowing the transfer so your heating and cooling systems don't have to work as hard.
No material stops heat transfer entirely. The goal is to slow it enough that your home stays comfortable without excessive energy use.
15%
Heat lost through an uninsulated attic
The US Department of Energy estimates that air sealing and insulating attics can cut heating and cooling costs meaningfully in most US homes.
R-38 to R-60
Recommended attic R-value in cold climates
The DOE's Zone Map assigns recommended insulation levels by geographic region; colder zones require higher R-values.
6.5 per inch
Approximate R-value of closed-cell spray foam
Closed-cell spray foam achieves the highest R-value per inch of common insulation materials, making it useful where space is limited.
What R-Value Actually Means
R-value is the standard measure of a material's thermal resistance - its ability to resist heat flow. A higher R-value means more resistance and better insulating performance. R-values are additive: two layers of R-13 batts together deliver roughly R-26.
The US Department of Energy publishes recommended R-values by climate zone and location within the home. Colder northern climates generally require higher R-values than warmer southern ones. As a general orientation, attics in cold climates typically call for R-38 to R-60, while attics in warm climates may only need R-30 to R-38. Always check the specific recommendation for your ZIP code, as local codes may set minimum requirements.
Before adding more insulation, air-seal gaps around recessed lights, plumbing penetrations, and top plates first. Insulation slows conduction, but drafts bypass it entirely - sealing is often the higher-impact step.
Air leakage can account for a substantial portion of a home's heating and cooling losses, and no amount of insulation compensates for large gaps in the building envelope.
When buying batts, choose the width that matches your stud spacing exactly - 15 inches for 16-inch-on-center framing, 23 inches for 24-inch-on-center. A batt that's too narrow leaves a gap; one that's compressed loses R-value.
Fiberglass insulation relies on trapped air pockets to resist heat flow. Compression flattens those pockets and reduces effective R-value even if the label shows a higher rating.
The Main Types of Insulation
Several insulation materials are in common use, each with distinct characteristics:
- Fiberglass batts: Pre-cut panels of spun glass fibers designed to fit between studs and joists. They are widely available, relatively affordable, and suitable for DIY installation in accessible spaces. They must fit snugly to perform well - gaps and compression both reduce effectiveness.
- Mineral wool (rock wool) batts: Similar in form to fiberglass but made from volcanic rock or industrial slag. Generally more fire-resistant and better at blocking sound than fiberglass, and it tolerates some moisture without losing shape.
- Blown-in (loose-fill): Cellulose (recycled paper) or fiberglass blown into cavities using a machine. Excellent for filling irregular spaces and retrofitting existing walls without major demolition. Cellulose is treated to be fire- and pest-resistant.
- Rigid foam boards: Panels of polystyrene (EPS or XPS) or polyisocyanurate. High R-value per inch, moisture-resistant, and useful on exterior walls, basement walls, and under slabs.
- Spray polyurethane foam (SPF): Sprayed as a liquid that expands and hardens. Open-cell foam is softer and less expensive; closed-cell foam is denser, provides a vapor barrier, and achieves the highest R-value per inch of any common insulation material.
Where Each Type Fits Best
Matching the insulation type to the location is as important as the R-value itself.
- Attic
- Blown-in cellulose or fiberglass is the go-to for attic floors - it's fast to install, covers joists evenly, and can be layered to hit high R-value targets. Batts work on attic floors too, but blown-in tends to fill gaps more completely.
- Exterior walls (new construction)
- Fiberglass or mineral wool batts sized for 2×4 or 2×6 stud cavities are standard. Rigid foam sheathing added to the exterior of the wall assembly boosts overall performance significantly.
- Exterior walls (retrofit)
- Blown-in insulation injected through small holes drilled from outside (then patched) is the most practical option without full wall demolition.
- Basement walls
- Rigid foam boards or closed-cell spray foam are preferred because they resist moisture. Standard fiberglass batts against a concrete basement wall can trap moisture and lead to mold - see our article on how damp gets into homes for context on why moisture management matters here.
- Crawl spaces
- Depends on whether the crawl space is conditioned (connected to the home's air system) or vented. Vented crawl spaces typically use batts between floor joists; conditioned crawl spaces are better served by insulating the perimeter walls.
- Rim joists
- Small cut pieces of rigid foam or spray foam cans are effective here - these are a notorious cold-air leakage point that is easy to overlook.
Start With an Energy Audit
Before purchasing any insulation material, consider scheduling a professional home energy audit. Auditors use blower-door tests and thermal imaging to pinpoint exactly where your home is losing conditioned air. Tackling the right locations in the right order yields far better results than guessing.
Moisture, Vapor Barriers, and Insulation
Insulation and moisture control are inseparable. When warm, humid air contacts a cold surface inside a wall or ceiling, it can condense into liquid water - a process that degrades insulation performance and can lead to mold or structural rot over time.
A vapor retarder (commonly called a vapor barrier) is a material - plastic sheeting, foil facing, or certain paints - that slows moisture-laden air from migrating into wall assemblies. Where the vapor retarder belongs depends on your climate: in cold climates it typically goes on the warm (interior) side of the insulation; in hot, humid climates the approach can differ. Installing it on the wrong side for your region can trap moisture inside the wall rather than keep it out.
Closed-cell spray foam is itself a vapor retarder, which is one reason it's favored in moisture-prone areas like basements. Always verify local code requirements for vapor control before finalizing your approach.
Climate Zone Matters for Vapor Control
The correct placement of a vapor retarder varies significantly by climate zone. In mixed-humid climates (much of the mid-Atlantic and Southeast), vapor retarders are often omitted or replaced with vapor-permeable membranes. Always confirm the approach recommended for your specific region before installation, as getting it wrong can trap moisture inside your walls.
When to Call a Professional
Several insulation scenarios genuinely require professional involvement, not just because they're difficult but because they carry safety or code implications:
- Spray polyurethane foam: Professional two-part SPF involves chemicals that require respirators, protective gear, and proper ventilation. DIY aerosol cans are available for small gaps, but full-wall or attic applications should be handled by a certified installer.
- Electrical and recessed lighting: Covering certain older recessed light fixtures with insulation is a fire hazard unless the fixture is rated IC (insulation contact). An electrician or insulation contractor should assess your fixtures before attic insulation is added.
- Knob-and-tube wiring: Many insulation materials cannot legally be installed in contact with this older wiring style. Have an electrician evaluate before proceeding.
- Gas lines and mechanical systems: Any work near gas lines should involve a licensed professional.
- Permits: Some insulation upgrades - particularly those tied to energy rebate programs or structural changes - may require a permit. Check with your local building department.
For a straightforward attic job using blown-in or batts in an accessible space with modern wiring, many homeowners handle the work themselves. When in doubt, getting a professional energy audit first is a practical way to identify priorities and spot any conditions that rule out DIY.
Permits and Codes Apply to Insulation Work
Insulation projects connected to rebate programs, energy upgrades, or changes to the building envelope sometimes require permits or inspections. Local building codes also set minimum R-value requirements. Always check with your local building department before beginning work, and verify that any contractor you hire is familiar with local requirements.